Musings Of An Oil Painter


Magazine Article

The making of a New Old Master - The Ponte Vedra Recorder


The making of a New Old Master

Local artist wows adherents of a timeless style

Posted Sunday, August 31, 2025 8:00 am

In the time of the Old Masters, patrons always played an important role. Without them, the world might never have known about the genius of artists like Rembrandt.

For Jacksonville native Julianna O’Hara, who is making a name for herself as a painter in the Old Masters style, that patron was her grandmother.

Though cognizant of their middle daughter’s talent and interest in art, O’Hara’s parents did not have the financial wherewithal to fund the child’s creative pursuits. But her grandmother had a friend who taught a class in oil painting, mostly to older women, and the means to pay for her granddaughter’s lessons and supplies.

“I had a little tackle box, and I would take it on 

Wednesdays to this private class,” recalled O’Hara. “I only had three paintbrushes, and I had certain colors; I didn’t have the luxury 

of having a whole palette of different oil paints.”

A tube of quality oil paint, even back then, was $25.

O’Hara said these early lessons were extremely important to the development of her art. This is where she discovered critical techniques that many might find counter-intuitive.

It took young Julianna about four weeks to complete a painting, always a still life, and her grandmother would always frame it.

“Those pictures are still framed at my father’s house,” O’Hara said.

But her talents had been obvious from the beginning.

“I would sit there in kindergarten doing Snoopy cartoons, Snoopy on his little house,” she recalled. “In kindergarten, they wanted everybody to draw their favorite food. I was like: I love chicken legs. I drew a chicken leg with the bumps and the shadows and everything. All the other kids were drawing a candy bar or a piece of candy. Then, we walked around the class; I was holding it up, and I remember the kids were like: ‘That’s a chicken leg!’ The teacher went to my mother and said, ‘Julianna’s got some talent; she drew a chicken leg!’”

She continued to draw and paint throughout her teen years and later, while living in California, audited classes at Santa Monica College through UCLA Extension. But she knew she couldn’t make a career of her passion for art.

A personality test pointed her in a practical direction and she took up dental hygiene, earning her degree and working from a small office in Columbia, South Carolina.

“It was one little, tiny window, and I thought: Is this going to be my life?” she said. “I wanted something more.”

Since then, she said, “I have lived a thousand lives.”

In her 20s, she moved to California, where she joined Screen Actor’s Guild and appeared on “Days of Our Lives” and “Golden Girls” and industrial films made for corporate use, describing the features of a new car or anti-glare eyeglass lenses. She did stand-in work, once for Meryl Streep.

Throughout it all, dental hygiene provided a reliable income.

Meanwhile, she was creating huge abstract paintings in acrylic, which were collected by friends.

Finally, in her early 30s, she abandoned the Golden State and returned to South Carolina at the suggestion of her mother, who encouraged her to get a real estate license. Six months later, she returned to California to visit friends and met the man she would marry, a physicist and Bostonian, Michael O’Hara. The wedding took place in St. Augustine on the grounds of Mission Nombre de Dios in the tiny chapel of Our Lady of La Leche.

The couple divided their time between Carmel, California, and the First Coast, finally retiring to Ponte Vedra Beach, where Julianna O’Hara has devoted much of her attention to her art.

Here, she regularly shows her work at the Sawgrass Art Show. She also had a recent solo exhibition at the First Coast Cultural Center. As part of that show, she added an interesting dimension by including some of the props she had used in her paintings.

O’Hara has been painting seriously for the past decade, increasingly entering her work in contests and shows internationally, but she has not stopped learning.

She found YouTube videos devoted to Ignace Henri Jean Theodore Fantin-Latour that gave her ideas for her setups. And she has been taking classes online from Gregg Kreutz at the Art Students League in New York and David Leffel, who has been called a living Rembrandt.

But despite her accomplished still lifes, the awards she’s won and often being juried into Oil Painters of America shows – which she calls “a tough nut to crack” — O’Hara maintains a laudable humility.

“I still consider myself a student,” she said. “Even David Leffel says he is still a student.”

A self-professed night owl, O’Hara begins painting in the afternoons, usually for between two and four hours a day. She often gets lost in her work and doesn’t even know what time it is.

“I’m in a heavenly place when I’m painting,” she said. “It’s a rare place to be. I can almost match it when I’m walking the beach, but nothing like whenever I’m in my studio painting.”

In that studio, she paints while standing, which infuses her work with an almost intangible energy. As a consequence, she must place her subjects on artificially high “tables.” She marks her place on the floor so that she can always be sure to view her subject from the precise same angle, which is critical to ensuring that reflections of light and shadows remain consistent.

Mirrors allow her to check her progress in a technique that enables right-brain painting.

O’Hara was first introduced to the benefits of right-brain painting in that class she took as a child.

Struggling to draw a bottle’s symmetry, she received a valuable piece of advice from her instructor: Turn it upside down. This allowed her to escape preconceptions and see the bottle’s true shape.

The teacher added some companion advice: Pay attention not to the object being drawn but rather to the negative space around the object.

Another key component of her studio is the light source.

The Old Masters exclusively relied upon light from a single source, always coming from the north, which wasn’t subject to the waxing and waning of shadows as the day wore on.

“The reason those paintings look different than what you see now is because they used north light,” O’Hara explained. “So, any studio pretty much in Paris or New York, they’re going to have a north light window.”

Because her studio doesn’t have a window in the correct place, and because she often paints after dark, O’Hara substitutes a strategically placed “daylight bulb” that mimics actual sunlight.

“It’s a nice light,” she said. “You have these beautiful, warm shadows.”

O’Hara paints exclusively in oils and on expensive linen. She does not paint from photographs – except when she is trying to capture flowers that may die -- and does not take commissions.

When she’s working, the phone is off, there’s no TV, the windows and plantation shutters are closed. She does, however, play music.

Talking about her art, her journey, and all that has contributed toward it, O’Hara returns several times to the gratitude she feels.

“I am so blessed,” she says with a broad smile.

To learn more about her work, go to juliannaohara.com.


Read Full Post


My blog for Oil Painters of America

Making The Most Of Your Art Studio Space

Do you wish your studio space were more functional? Do you want to paint more comfortably? Do you have limited space and wish to utilize as much of your available space as possible? I have found some fantastic ideas for my art studio space that I would like to share, and I would love to hear from you. What are your favorite things in your studio that make your life easier? 


I’ve been oil painting since the age of 11. I have had everything from a walk-in closet as a “studio” to using a small corner space in a studio apartment. I now work in a spare bedroom that I converted into my studio space. I spent most of my painting life with my tubes of paint in a tackle box or scattered about in random drawers. I have had canvases and frames scattered about so much at times that I have walked through a maze to get to my easel. The biggest struggle I have had is being comfortable at my easel! I stand when I paint, and I paint from life. I have stacked boxes on top of boxes to get a setup at the eye level I desired. I even spent one painful time painting with my knees bent and back hunched so that my eye level was ideal to my desired painting. 


There were a few years where I had the same “bird’s-eye” view because I couldn’t figure out a functional way to stand and paint with any other view. So, wherever you are, in a tiny studio or corner of a room or even if you have the luxury of a large studio space, we can all use some tips and tricks to make our lives easier. What I am about to share is affordable and easily obtained. 


MY #1 ALL-TIME FAVORITE STUDIO IDEA THAT HAS MADE A SIGNIFICANT IMPACT ON THE WAY I PAINT IS: a simple rack/ shelving system that can be found at any hardware store. I think these were originally designed for closets. I saw the studio of a dear artist friend of mine, Trish Wend. She also likes to stand when she paints and with her contractor designed a functional way to hang brackets on a wall and use adjustable bracket holders for any eye level she desired. Well, I immediately thought, “I want that!” I had a spare wall in my studio, so I excitedly went into the hardware store and purchased the simple items that changed my painting life forever. (I realize I am being dramatic, but it is the truth. I treasure painting from life and I am so happy with this little invention.) 
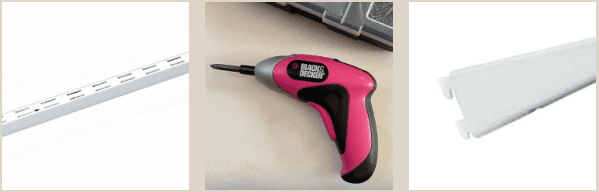
48″ bracket holders at $5 a piece – I bought four of each. 

I hung the bracket holders on the wall at various distances apart. For those who like to work from a computer monitor or photos, you can put your device at any eye level you wish and paint comfortably – no matter your height or stance. 


The brackets themselves run about $5 a piece as well. I bought four standard sizes and I did buy two special order 24″ brackets for my heavier table scenes. I think these were $10 a piece. 
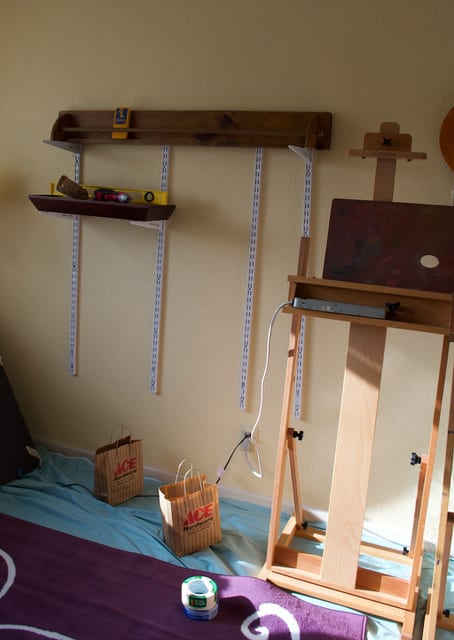
Don’t judge. 🙂 My engineer husband had to leave the room when he saw how I was hanging them. In case you’re curious too, there were already nail holes from a previous shelf. I used those holes for two of the bracket holders and the other two bracket holders are in studs. I love it because it gives me great flexibility in what I want to create and, also, the option to have two setups at the same time if I desire. 


So, for about $50 – I finally have a comfortable, interchangeable system for any and all of my still life setups. The moment of reckoning occurred as I tested my contracting skills to see if they would actually hold weight. I was quite proud of myself, pink drill and all. 
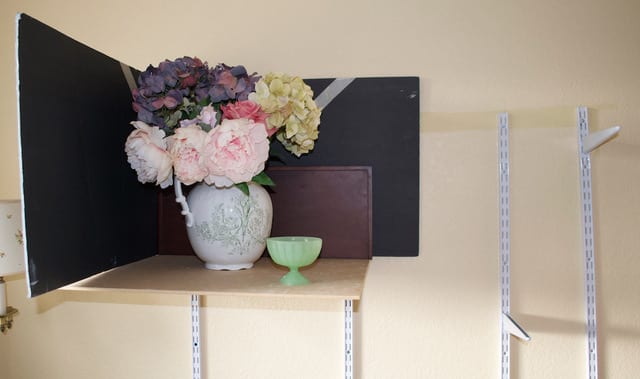
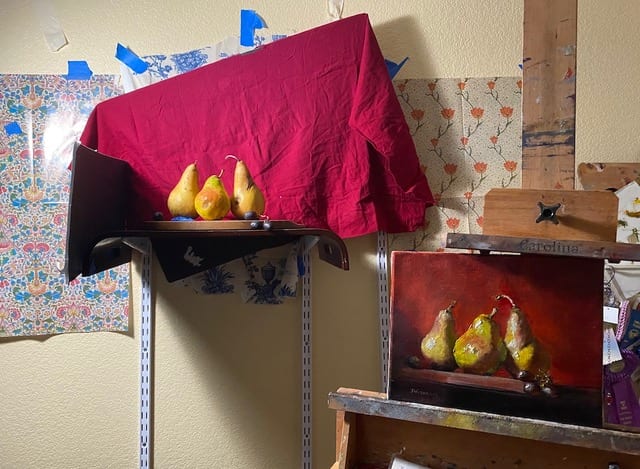
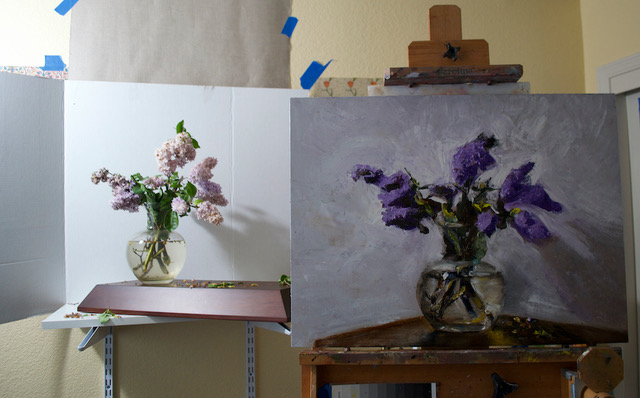
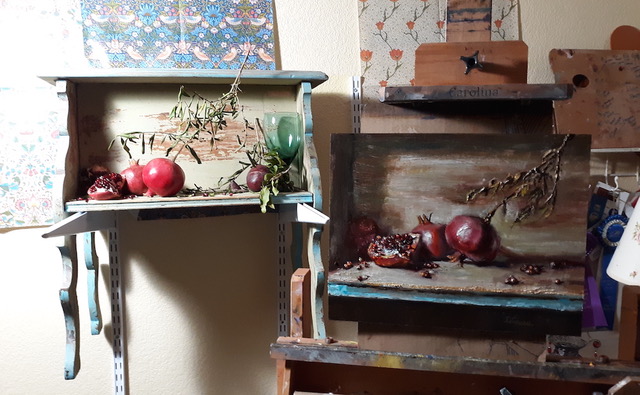
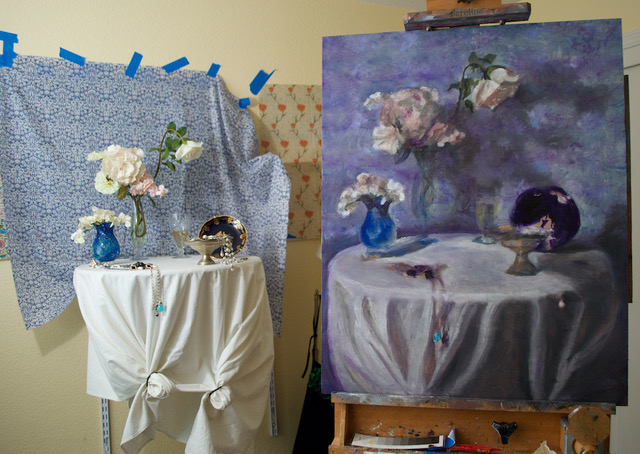
Some examples of the shelving system in action: 
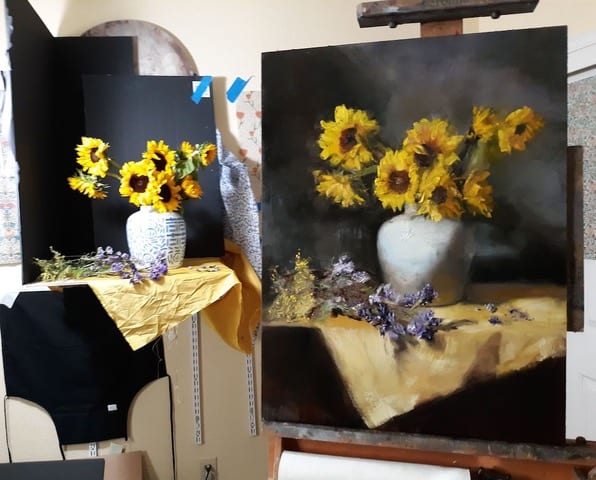
 

I would guess the above entire “scene” weighed about forty pounds. That back panel is an antique and heavy. I have not run across any issues with weight limitations. Now, I suppose if I had a model sit on a table, there may be some buckling walls or falling debris; but I’m not that silly. 
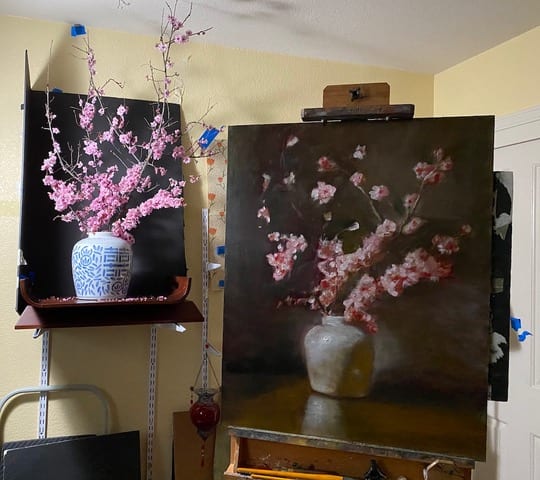
 

I know many artists are fancy; but I just use fabrics and cheap foam core from the dollar store for my shadow box configurations. I also use the dollar store foam core as my light blockers, and I have a collection of gorgeous fabrics that I love to play around with in scenes. The possibilities are endless. I have even used towels or shirts as “drapery” or “tablecloths”. There have been times in my life where I felt that I didn’t have the “perfect” props or supplies. Now I know what a huge waste of time that was for me. Nothing is perfect. Make do with what you have and believe me, you have a lot! 
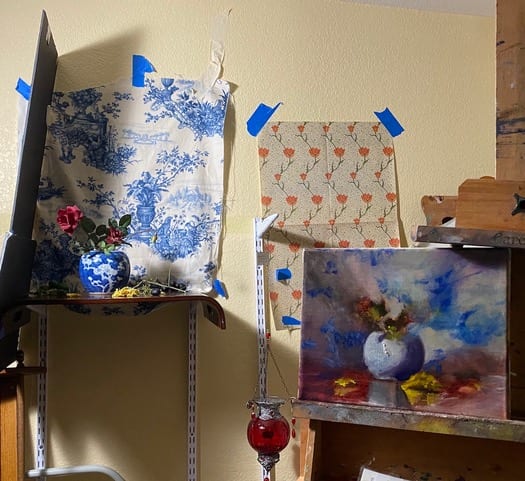
 

The above red cloth is from an old ottoman I used to have. I cut the fabric off the top before throwing the ottoman away. I then just wrapped the cloth around a piece of foam core. The pears are sitting on an old cutting board and I have blue painter’s tape keeping them upright. I called this one “The Pears From Hell, and Grapes” Gosh, those things were changing colors on me by the hour! Anyway, I digress…. back to the studio shelf examples: 
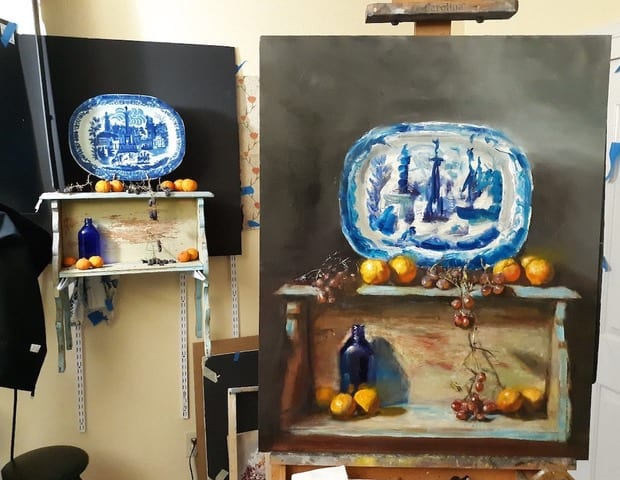
 

So, you get the idea. I can do anything and everything with these brackets and bracket holders. I do recommend getting the 24″ bracket for the heavier projects – the additional depth is very helpful for tables or furniture. 


My other favorite things in my studio are: 


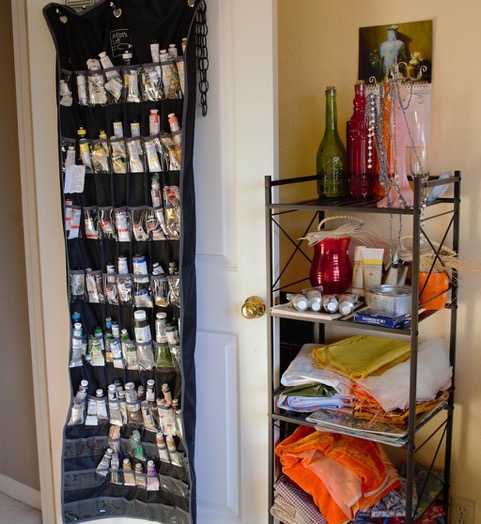
PAINT TUBE STORAGE – I’ve seen some artists use shoe holders. I found this at an art supply store (Artist’s Loft makes it) and don’t know how I lived so many years digging around for paint in drawers or toolboxes. 
 

SPACE SAVERS – I love, love, love this panel/canvas holder. This can be configured in three different ways, and I personally like this version for my specific needs. This is called “Rue Panel Ladder and Storage Rack”. 


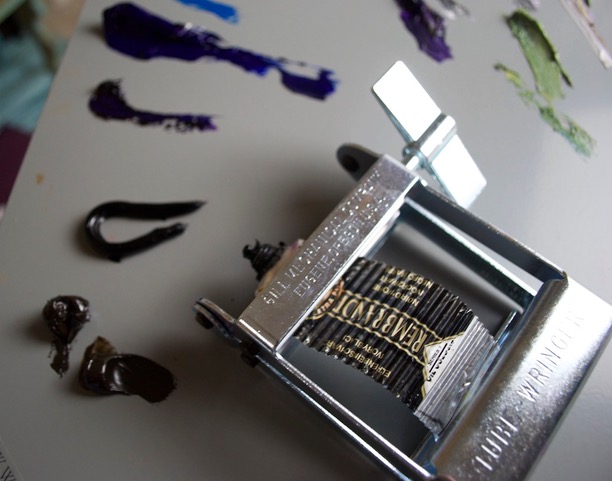
TUBE WRINGER!!! – I’d love to know what took me so long to get one of these babies. Goodness gracious! The amount of paint I can get out of an otherwise “empty” tube is amazing! 


My favorite one is: “TubeWringers Metal Rollers By Gill Mechanical Co”. I know some artists who use plain ole’ toothpaste tube wringers. I also cut the cinched part and fold the bottom. 
 

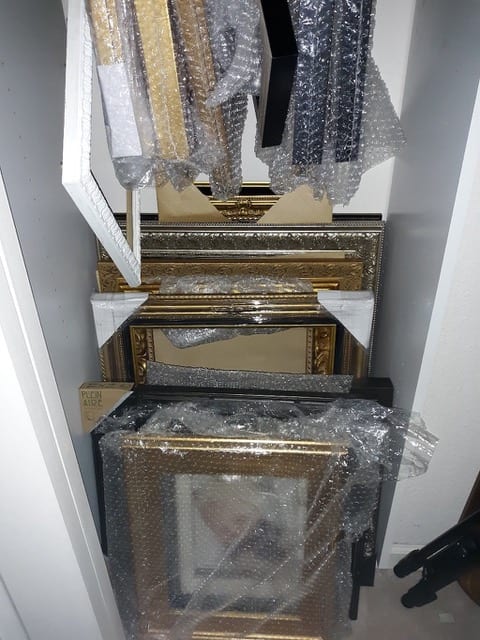
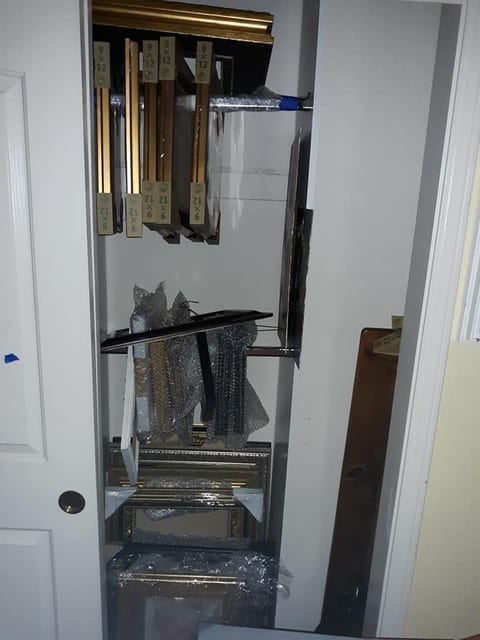
FRAME STORAGE – One other thing that I love that saves me so much space is hanging my frames in a closet. It just so happens those bars lift up, so I decided to stack some frames on them with bubble wrap on the bars to stop scratching. Frames used to take up an inordinate amount of space in my studio. 
 

CONCLUSION – The possibilities are endless for more efficient art studio space and I have discovered my favorite things by implementing ideas from so many clever artists. Save interesting old fabric, save beautiful vases and props, and maybe get art supplies up off of flat surfaces into accessible, vertical storage of some kind. 


I would love to hear your favorite Studio Tips and Tricks in the comments below.

Snapshot of the Author

Read Full Post


My Art Journey - Earliest sketches

I recently got my old sketch pads and charcoal and kneaded erasers out to do some larger sketch studies and I happened upon an old sketch book and inside was a folded piece of large paper (construction paper?) - so this is what I found:

I remember drawing before I could spell - I think these were around the 1st or 2nd grade - I used to watch cartoons or look at comics in the newspapers and practice drawing - I loved Blondie, Charlie Brown and Andy Capp.  

So, this is what I just found: 

My grandmother used to keep my sketches in her hutch but when she passed away, I think most of them were thrown away - these survived.

I can't understand the paper I was using - because it looks like it came from a large sketch pad but I know I did not have one at the time.  It could have been some type of construction drawing paper?

I look at this and think it is cute how I added certain details at such a young age.  The wrinkles in the paper, her fingers on the table, the Andy Capp lady with her foot perspective ( I did not know what perspective was then) - I think I was just drawing what I saw.   I don't know why, but I find it funny and curious that I signed each little sketch in the bottom right corner - this is how I sign most of my paintings to this day and these were just 3 or 4 inch studies at the time. 


The next big change that happened for me in a huge way was when I took a class through UCLA "Drawing On the Right Side Of The Brain" based on the now famous book by Betty Edwards (https://www.amazon.com/Betty-Edwards/e/B00B5HRI4S?ref=dbs_p_ebk_r00_abau_000000) = my instructor was a good friend of Ms. Edwards who wrote the book and it was cutting edge back in the late 1980's - people weren't talking about "left brain" or "right brain" back then.  I learned about negative shapes, turning things sideways, upside down, looking at my sketch in a mirror, anything to stop myself from thinking I am drawing "things" - I am drawing negative shapes or small value patterns - not a person or thing or "it".  

My curriculum was in my old sketch pad


- my instructor was so fabulous - Linda Jo Russell was informative - fair in her critique and truly wished for the best in all of her student's work.  I just googled her and she seems to have a wonderful career in Orange County and of all things, is now painting gorgeous abstract paintings!  With all of her drawing skills, she seems to have abandoned rendering nature as we all see it but she renders beautifully how she sees nature.  I don't want to seem like a fangirl but I am going to reach out to her.  She was significant in my life and I appreciate her immensely.  

Here are some of my charcoal drawings from the course:

I'm not sure, but I think this must have been my first ever self portrait in a mirror.  I recognize my eyebrows and my lips -and probably the hair - the likeness is not exact but this is what happens when you are drawing negative shapes and values.  I think this is how I rendered myself in the late 1980s.

I very much remember drawing this in charcoal - it was the first time I drew an ear that I thought was awesome and it was all because of not seeing an "ear" but just looking at the negative shapes around and in it:


I think what I do now is I see negative shapes anywhere and everywhere I can find them - the kiss of death for a painting for me is when I start trying to paint an object or thing.  I am always concentrating on maintaining the negative shapes or what some call the abstraction.


Thank you Mrs. Linda Jo Russell and to all art teachers everywhere - you have no idea how important you are and the profound impact you make on your student's life. 


Read Full Post


Let's get this blogging started

I love blogs because they serve as a journal - like a favorite family photo album that one can reference again and again.  I hope to update regularly - my goals this year are to continue painting daily and I want to continue visiting museums and art galleries - especially since I live so close to Carmel and Monterey California, the art gallery capital of the United States.


I am more a photo person than a word person - I like to live a book and not read a book so this blog should be filled with tons of photos by the time I am done :).


I had an absolutely fabulous 2018 - I attended many workshops, painted like a demon and have used more oil paint and linen than I could ever have imagined.  My heart wants to continue on the intimist painter path - that feels so right to me - not so much a still life on a table as a story behind the table and the surroundings.  I spend much more time planning and working out a composition than I do painting it - once I start the block in phase, I have pretty much imagined the finished painting in my head.  


My most recent favorite paintings are my red analogous studies - what fun - I love oil paint for the texture, beauty, richness and I love my brushes and palette knives to sculpt and explore and play with the medium.  

It took me about 3 weeks to get the exact fabric I imagined for my "tablecloth" - it is a soft, velvety rich orange fabric.  The "wallpaper" fabric came from my collection of fabrics from Liberty of London - beautiful fabrics inspire me and I treasure my collection of heirloom china and silver for continued inspiration.  


My next adventure will be blue analogous studies - I've already started designing the composition - I can't wait to have it to the level of pleasure and satisfaction so that I begin to paint the canvas.  It is always like magic to me when the canvas starts to come alive - it brings me great joy.


Henri LeSidaner is my favorite intimate artist and his analogous studies inspire me.  


The Table, Grey Harmony


Owner/Location: Private collection
Dates: 1927
Artist age: Approximately 65 years old.
Dimensions: Height: 92.3 cm (36.34 in.), Width: 73.6 cm (28.98 in.)
Medium:

Painting - oil on panel


SEE!!!!!!!!    That is why I paint like a demon and am so inspired - isn't his Grey Harmony painting gorgeous!!!   My first large painting purchase was when I was in my twenties of one of Le Sidaner's garden scenes - an embellished  giclée  .   Then, I was lucky enough last year to acquire one of his original watercolors from an auction house in Florida.  He was such an excellent draftsman.  Wish me well with my blue/grey analogous studies - Mr. LeSidaner has set a high bar.


In another post, I will post a photo of the first Le Sidaner I purchased when I was in my twenties (the embellished  giclée  ) - that painting has been hauled around with great care for so many years and it stands proud now in my stairway entrance and I love it today as much as the day I bought it - the original watercolor moves me deeply - to hold the frame from the 1800s and to see closely each brushstroke and the planning and superb draftsmanship - it makes me wonder what made him stop there, what made him decide to paint THAT scene and I wonder how long it took him to complete it - from inspiration to signature.  


I'm excited about the upcoming year and look forward to getting to know you.  Thank you for your time.

Read Full Post